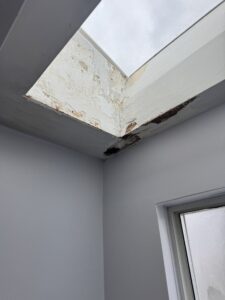
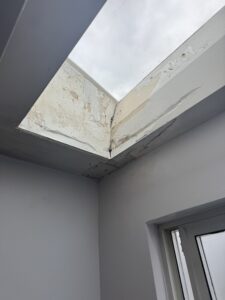
Water damage to your ceiling can be a homeowner’s nightmare, leading to stains, structural issues, and potential health hazards like mold and mildew growth. Addressing this promptly is crucial to maintaining the integrity and safety of your home. In this guide, we’ll walk you through the essential steps to repair drywall after a ceiling leak, ensuring a professional finish.
Contents
1. Ensure Safety: Test for Asbestos, Test For Mold
Before beginning any repair work, especially in homes built before 1990, it’s imperative to test for asbestos. Disturbing asbestos-containing materials can release harmful fibers into the air, posing serious health risks.
-
Why Test for Asbestos? Asbestos was commonly used in building materials, including drywall, for its fire-resistant properties. If your drywall was installed before 1990, have it tested for asbestos.
-
How to Test: Contact a certified asbestos testing service to collect samples and analyze them in a laboratory. In the Vancouver area, companies like BC Hazmat Inspections offer professional asbestos testing services.
- Test For Mold: After the area has been tested for asbestos, you’ll either remove the asbestos using a certified pro, or simply remove it normally, depending on the results. Once the drywall has been removed though, you’ll need to have the interior of the now opened space tested for mold, especially if mold spores are visible.
2. Remove Damaged Materials
Once you’ve confirmed the absence of asbestos or mold, proceed to remove the compromised sections of the ceiling.
-
Cut Out Damaged Drywall: Use a utility knife or drywall saw to cut out the damaged area, extending slightly beyond the visible damage to ensure all compromised material is removed. Cut back the drywall to the closest joists for attaching the replacement sheet.
-
Dry the Area: Before installing new drywall, ensure the area is completely dry to prevent future mold growth. Use fans or dehumidifiers to expedite the drying process.
3. Address Any Mold
Mold thrives in damp environments and can pose health risks if left untreated.
-
Check for Mold: Inspect the exposed area for any signs of mold, such as discoloration or a musty odor. If mold is present and heavy, consult a remediation expert to remove the moldy aspects safely.
-
Remove Mold: If a very small amount of mold is present, clean the area thoroughly. After cleaning, apply a mold control solution like Concrobium Mold Control to prevent future growth. Ensure to use proper PPE for this situation.
4. Install New Drywall
With the area prepped, it’s time to install the new drywall.
-
Measure and Cut: Cut a sheet of drywall to fit the gap, ensuring it matches the thickness of the existing ceiling drywall.
-
Secure the Drywall: With assistance, lift the drywall into place. Use a drill and drywall screws to attach the drywall onto the ceiling.
5. Tape and Apply Joint Compound
Achieving a seamless finish requires careful taping and multiple coats of joint compound.
-
Apply Paper Tape: At the seams where the new drywall meets the existing ceiling, apply paper tape over a thin layer of joint compound. Paper tape is preferred for its strength and resistance to cracking.
-
Multiple Coats: Ceilings typically require 3-4 coats of joint compound to achieve a smooth, even surface. Allow each coat to dry completely before sanding lightly and applying the next.
6. Prime and Paint
Once the final coat is dry and smooth, finish the repair by priming and painting.
-
Prime the Surface: Apply a quality primer to seal the joint compound and prepare the surface for paint.
-
Paint to Match: Paint the repaired area to match the rest of the ceiling, blending carefully to ensure a uniform appearance.
Professional Assistance in the Vancouver Area
Repairing ceiling drywall after a leak can be a complex and labor-intensive process. If you prefer professional assistance, Microworks is here to help. Serving Vancouver, North Vancouver, West Vancouver, Burnaby, and Bowen Island, our experienced team ensures high-quality repairs with minimal disruption to your home.
Contact Us Today:
-
Phone: 604-836-4178
-
Website: microworkshandyman.com
Let Microworks handle your drywall repairs, so you can have peace of mind knowing the job is done right.