Adding a drop leaf to a kitchen island looks like an easy way to gain extra prep or dining space. It is basically just a hinged board, right? In reality, getting it to sit flush, swing smoothly, stay level, and actually support weight takes more planning than most homeowners expect.
This guide walks through how a custom hinged island leaf is typically built and installed, so you can understand the process and decide whether it is a DIY you want to tackle yourself.
Contents
- Why This Type of Project Matters
- Tools Needed
- Materials Needed
- Safety First
- Step 1: Measure the existing countertop and island structure
- Step 2: Cut and prep the leaf panel
- Step 3: Dry fit and mark hinge placement
- Step 4: Install the piano hinge
- Step 5: Build and install the knee braces
- Step 6: Finish and protect the wood
- Why Vancouver Homeowners Choose Microworks Handyman
- Before Hiring Any Handyman, Make Sure They Have:
- Need Help With a Custom Island Leaf Installation in Vancouver?
Why This Type of Project Matters
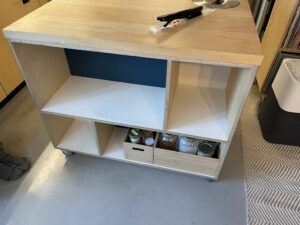
A poorly installed island leaf can sag, bind at the hinge, or feel unsafe when someone leans on it. Because this island is on wheels, movement and shifting weight make support even more important. When done properly, a hinged leaf adds real usable space and blends seamlessly with the existing countertop instead of looking like an afterthought.
Tools Needed
-
- Tape measure
- Pencil and straight edge
- Circular saw or track saw
- Random orbit sander
- Drill and impact driver
- Countersink bit
- Clamps
- Level
- Paintbrush or foam roller
Materials Needed
- Solid wood panel matching countertop thickness
- Continuous piano hinge
- Hinged knee brace hardware or folding supports
- Plywood for brace fabrication
- Wood screws
- Clear polyurethane finish
Safety First
Before you start, protect yourself with basic PPE (Personal Protective Equipment).
- Safety glasses
- Gloves
- Dust mask or respirator
Step 1: Measure the existing countertop and island structure
Using a tape measure, confirm the countertop thickness and available overhang. This step matters more than it seems because the new leaf must match the existing top exactly. Even a few millimeters off will be noticeable once installed.

Step 2: Cut and prep the leaf panel
The new wood section is cut to size using a circular saw, then sanded on all faces with a random orbit sander. The edges need extra attention since they remain fully visible when the leaf is folded down.
Step 3: Dry fit and mark hinge placement
The piano hinge is positioned tight against the existing countertop edge and clamped in place. Marking screw locations carefully helps avoid misalignment, which is one of the most common DIY mistakes with drop leaves.
Step 4: Install the piano hinge
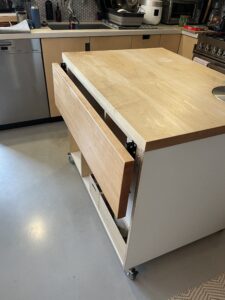
Using a drill and countersink bit, the hinge is secured along the full width of the leaf and the island top. A small gap is intentionally left so the leaf can swing freely without rubbing.
Step 5: Build and install the knee braces
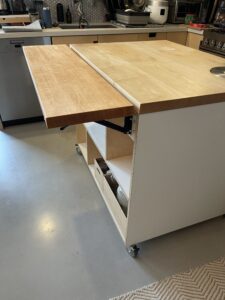
Plywood supports are cut and hinged underneath the leaf. These braces swing out when the leaf is open and lock into position to keep the surface level. This is what allows the leaf to safely handle weight instead of flexing.
Step 6: Finish and protect the wood
A clear polyurethane finish is applied with a brush or roller. This protects against spills, moisture, and daily wear, which is essential in a kitchen environment. Multiple thin coats provide the best durability and appearance.
Why Vancouver Homeowners Choose Microworks Handyman
Microworks Handyman builds custom kitchen solutions across Vancouver that look intentional and function properly long term. From precise measurements to hidden support systems and clean finishing, we focus on details that make projects last and feel solid in daily use.
Before Hiring Any Handyman, Make Sure They Have:
- WorksafeBC coverage
- Valid business license
- Liability insurance
- Warranty offered on work
Need Help With a Custom Island Leaf Installation in Vancouver?
If you started planning this project and realized it is more involved than expected, Microworks Handyman can help. We design and install custom island extensions that match your space, support real use, and blend seamlessly with your existing kitchen.
Contact Microworks Handyman to schedule your custom island leaf installation in Vancouver.